OgreMapper
Ogre Map
- Ogre Map
- Usage: Ogre Map
- In the isxeq2 drop down command window type: Ogre map -- This allows you to map a zone and mark waypoints. Useful when running other ogre tools such as ogre harvest, or autohunt
Ogre Navigation and Mapper Information
This information is how to use Ogre Navigation, and the mapper. (OgreNav_Lib).
This does not support flying or swimming.
POINTS not PATHS:
In many of the previous Navigations, you could plot out a specific path. OgreNav doesn't work like that. It plots out points. Then when you want to go some where, it determines the best way to get there, from all the points it has available to it.
The mapper maps EVERY single spot your character goes. All connections are 2 way. This means you NEED to be careful when mapping. Do NOT jump, do NOT run over cliffs, or go down hills you can't go back up.
How to create a map
While it technically doesn't matter why you are creating a map, I'll use some best practices and some examples to show how to create a map.
- 1 Rule. NEVER, EVER, name a point with a number only. It breaks your entire map. You have been warned.
General Movement:
- Lets say you travel quite often to a zone that doesn't have any easy travel. So you wish for the bot to handle the movement for you. Lets take an example: In Antonica, you travel frequently from the NQ zone in, to the Mage Tower. (Yes, for now ignore there is the bird system, it's just an example!).
- Starting at the NQ zone in, you would start the mapper ( Ogre Map ). Because we'll want to travel back to this point, we'll want to name it.
- Press F2 and name it. I personally prefix everything. In this case "ZoneNQ".
- Now run to the Mage Tower, keeping in mind, these are the points the bot will navigate through to get there also. So no jumping, and no running off cliffs.
- When you arrive at the Mage Tower, press F2, and give it a name "MageTower".
- Now you can save and exit the mapper (F12).
- Your map is now completed for this journey. See Ogre Move to see how to travel between them.
Map Creation/Editing
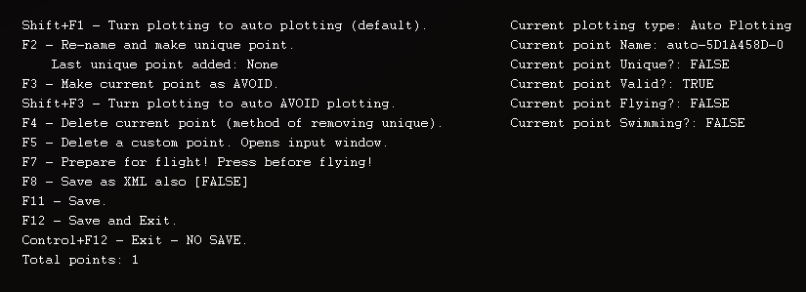
Map Creation/Editing Tools:
- - Shift+F1
- - Turns plotting to auto plotting (default).
- - Notes
- - Turns plotting to auto plotting (default).
- - F2
- - Name, or Re-Name your map.
- - It's a good idea to prefix the maps. "ZoneNQ" or "ZoneAntDocktoMT"
- - Name, or Re-Name your map.
- - F3
- - Make current point an area to AVOID.
- - Notes
- - Make current point an area to AVOID.
- - Shift+F3
- - Turn plotting to auto AVOID plotting.
- - Notes
- - Turn plotting to auto AVOID plotting.
- - F4
- - Delete current point (Methos of removing Unique).
- - Notes
- - Delete current point (Methos of removing Unique).
- - F5
- - Delete a custom point. Opens input window.
- - Notes
- - Delete a custom point. Opens input window.
- - F7
- - Prepare for flight! Press before flying.
- - This Centers your camera for Flying.
- - When making a flying path make sure your camera is centered and use ( Home and End ) to fly up and down ( Do NOT use the mouse )
- - Prepare for flight! Press before flying.
- - F8
- - Save as XML also. [FALSE]
- - Notes
- - Save as XML also. [FALSE]
- - F11
- - Save.
- - Saves map
- - Save.
- - F12
- - Save and Exit.
- - Saves and exits the map creation tool.
- - Save and Exit.
- - Control+F12
- - Exit - NO SAVE.
- - Exits editing tool without saving your work for this session.
- - Exit - NO SAVE.
