Difference between revisions of "OgreOther:AutoLogin"
(→Before You Begin) |
|||
| (7 intermediate revisions by 2 users not shown) | |||
| Line 8: | Line 8: | ||
==Before You Begin== | ==Before You Begin== | ||
In order to use OgreAutoLogin, you need the following set up prior. | In order to use OgreAutoLogin, you need the following set up prior. | ||
| − | * A blank loginscene. Information on obtaining one can be found in the [[NewUserWalkthrough: | + | * A blank loginscene. Information on obtaining one can be found in the [[NewUserWalkthrough:Page07|NewUserWalkthrough:Page07]]. (Scroll down to the section titled <b>Blank loginscene</b>) |
* Your characters login informations must be filled first. This is done directly by starting ogre and using the EQ2Chars tab | * Your characters login informations must be filled first. This is done directly by starting ogre and using the EQ2Chars tab | ||
[[File:EQ2Chars.png]] | [[File:EQ2Chars.png]] | ||
| Line 14: | Line 14: | ||
* You need to have ISXOgre autoload. [[Help:AutoLoadingISXOgre|Auto loading ISXOgre]]. | * You need to have ISXOgre autoload. [[Help:AutoLoadingISXOgre|Auto loading ISXOgre]]. | ||
* You should add to make sure your pc is plugged in and turned on too [per ali in irc] | * You should add to make sure your pc is plugged in and turned on too [per ali in irc] | ||
| + | * Be running Innerspace in 64 bit mode. This is the default so you should not have to change it. You can check by right clicking on Innerspace -> Configuration and ensuring the option [x] Use 64-bit Inner Space Uplink is checked. | ||
== Step By Step == | == Step By Step == | ||
| Line 28: | Line 29: | ||
#:<code> <!-- 10 = 1s --></code> | #:<code> <!-- 10 = 1s --></code> | ||
#:<code> <Setting Name="TimeToWaitBetweenLoadingSessions">50</Setting></code> | #:<code> <Setting Name="TimeToWaitBetweenLoadingSessions">50</Setting></code> | ||
| − | #*Edit the <b>GameName</b> and <b>ProfileName</b> to match the values you used when you configured Innerspace. | + | #*Edit the values of the <b>GameName</b> and <b>ProfileName</b> settings to match the values you used when you configured Innerspace. NOTE: DO NOT CHANGE THE WORDS "GameName" and "ProfileName". You change the VALUE beside it. In this example above, you are changing "Everquest 2" and "everquest 2 default profile" to match what you have. |
#*If you are unsure of what your game name is you can right click the innerspace taskbar notification window | #*If you are unsure of what your game name is you can right click the innerspace taskbar notification window | ||
#:[[image:IS.taskbar.png]] | #:[[image:IS.taskbar.png]] | ||
#*At the top, you'll see a list of the "GameNames" innerspace knows about. | #*At the top, you'll see a list of the "GameNames" innerspace knows about. | ||
#*Moving your mouse over the Everquest2 game will show the name of the "ProfileName" you need to use. | #*Moving your mouse over the Everquest2 game will show the name of the "ProfileName" you need to use. | ||
| − | #*Use these exact names (case sensitive) when editing your | + | #*Use these exact names (case sensitive) when editing your AutoLoginSettings.xml file. |
#Create a Desktop Shortcut that will launch the Ogre Auto Login UI | #Create a Desktop Shortcut that will launch the Ogre Auto Login UI | ||
#*Right-click on your desktop and click 'New' -> 'Shortcut' | #*Right-click on your desktop and click 'New' -> 'Shortcut' | ||
Latest revision as of 15:06, 3 February 2024
Contents
Overview
OgreAutoLogin can open sessions, and/or use existing sessions, and log characters into specific sessions.
Note: This is an advanced feature. You will need to follow specific instructions, including creating windows short cuts to be able to set this up.
Remember: If you only want to auto login one character, all you need is to complete the "Before You Begin" section. Then launch EQ2, open the innerspace console (using the ~ key), and type "ogre login toonname" (without the quotes).
Before You Begin
In order to use OgreAutoLogin, you need the following set up prior.
- A blank loginscene. Information on obtaining one can be found in the NewUserWalkthrough:Page07. (Scroll down to the section titled Blank loginscene)
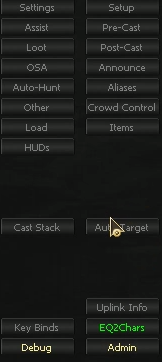
- Your characters login informations must be filled first. This is done directly by starting ogre and using the EQ2Chars tab
- You need to use the Uplink Info tab to fill out your computer(s) name(s)
- You need to have ISXOgre autoload. Auto loading ISXOgre.
- You should add to make sure your pc is plugged in and turned on too [per ali in irc]
- Be running Innerspace in 64 bit mode. This is the default so you should not have to change it. You can check by right clicking on Innerspace -> Configuration and ensuring the option [x] Use 64-bit Inner Space Uplink is checked.
Step By Step
- MAKE SURE you have completed the "Before You Begin" section! DO NOT SKIP ANY STEPS on EITHER of the pages linked above, or the rest of this will NOT work.
- Locate and edit the following file:
- - Patch 237 and above: Innerspace/Scripts/EQ2OgreCommon/OgreAutoLogin/AutoLoginSettings.xml
<Setting Name="GameName">Everquest 2</Setting><Setting Name="ProfileName">everquest 2 default profile</Setting><Setting Name="TimeToWaitAfterLoadingASession">150</Setting><Setting Name="TimeToWaitBetweenLoadingSessions">50</Setting>
- Edit the values of the GameName and ProfileName settings to match the values you used when you configured Innerspace. NOTE: DO NOT CHANGE THE WORDS "GameName" and "ProfileName". You change the VALUE beside it. In this example above, you are changing "Everquest 2" and "everquest 2 default profile" to match what you have.
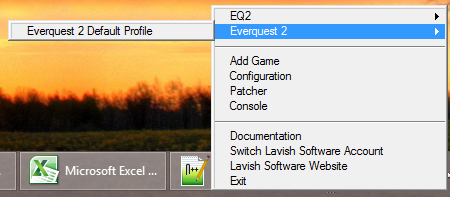
- If you are unsure of what your game name is you can right click the innerspace taskbar notification window
- At the top, you'll see a list of the "GameNames" innerspace knows about.
- Moving your mouse over the Everquest2 game will show the name of the "ProfileName" you need to use.
- Use these exact names (case sensitive) when editing your AutoLoginSettings.xml file.
- Create a Desktop Shortcut that will launch the Ogre Auto Login UI
- Right-click on your desktop and click 'New' -> 'Shortcut'
- Click the Browse... button to locate Innerspace/Innerspace.exe. This will put the path to Innerspace.exe in the "Type the location of the item:" box.
- Edit that line to append "runscript eq2ogrecommon/OgreAutoLogin/AutoLogin" after the path to the exe.
- The line should now look something like
- D:\Games\InnerSpace\InnerSpace.exe runscript eq2ogrecommon/OgreAutoLogin/AutoLogin
- or
- or
- "C:\Program Files\Innerspace\InnerSpace.exe" runscript eq2ogrecommon/OgreAutoLogin/AutoLogin
- (if the path to Innerspace.exe contains spaces or special characters, you'll need quotes around the path as shown in the 2nd example)
- Click the Next button, Give it a name and click Finish.
- Launch the Ogre Auto Login UI by double-clicking the desktop shortcut you just created.
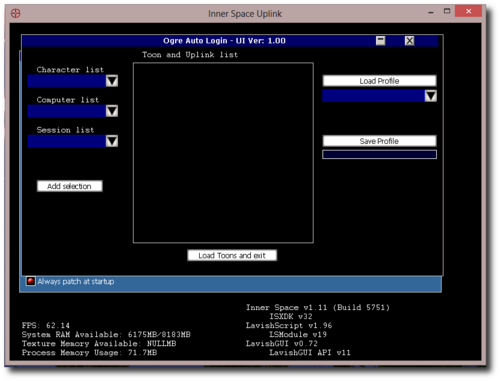
- Note: This loads INSIDE of the uplink console. Depending on your computer, it will pop up in front of you, OR you will see a new window in your task bar, go ahead and click it. If you can't find the window anywhere, right-click the Innerspace icon in your taskbar and select Console.
- The Character List (on the left) will contain all your characters you add in the EQ2Chars tab in Ogre.
- Select the first Character from Character List
- Select the PC you wish to use for this character.
- Select the Innerspace Session name to use for that character (e.g. IS1).
- Currently it performs the following checks
- If session is "Any"
- Toon will stay logged in on its current session
- If Session is specific "IS1" / "IS2" etc
- If toon online: Checks to see if the toon is on that specific session. If not, log off.
- If toon offline: If that specific session is in use, log that session off.
- If an alt (based off of EQ2Chars tab list) is logged on, they will be logged off to allow the characters you have selected to be logged on.
- If session is "Any"
- Currently it performs the following checks
- Click Add Selection
- Repeat for each character in the group you wish to have logged in at the same time.
- Type in a name to save the profile as (on the right side), then click the Save Profile button.
- The next time you run Ogre Auto Login UI, the saved profiles will be available under the "load profile" button.
- Click 'Load Toons and exit'.
- Wait for it to finish logging in all your toons (this can take a long time, even as much as a few minutes) then you can click 'X' to close the Innerspace Console.
- And you've now successfully set up and used Ogre Auto Login. You can just click your desktop shortcut any time you want, and it will launch the Ogre Auto Login UI (remember it might be in the background, or you might have to manually launch the Innerspace Console if your shortcut doesn't bring the window up automatically)
If you are happy with this, you can stop now. If you'd like to get even fancier, read the section below on launching a specific toon list directly from a desktop shortcut (without launching the Ogre Auto Login UI).
Loading a specific toon list profile
Once you have created a toon list profile using the step-by-step method above, you can automatically launch and login that profile using Ogre Automated Login, rather than using the UI.
- The AutoLogin script that your desktop shortcut runs can accept 1 parameter, a saved toon list profile. When a parameter is passed, it automatically runs the script in the background, bypassing the Ogre Auto Login UI entirely.
- IMPORTANT *** You MUST create the toon list profile using the Ogre Auto Login UI *BEFORE* you can use this
- Let's assume you saved your toon list profile as "MainGroup".
- Create a new Desktop Shortcut exactly like you did above.
- When you get to the part where you're appending to the Innerspace.exe path, also append "MainGroup" at the very end.
Example:-
D:\Games\InnerSpace\InnerSpace.exe runscript eq2ogrecommon/OgreAutoLogin/AutoLogin MainGroup
-
- Now you have two desktop shorcuts. The first one will launch the UI, and the second one will automatically log in your "MainGroup" toons, but will bypass the UI.
Quirks
- It's a good idea to have Innerspace running before you double-click your desktop shortcuts. Double-clicking your shortcuts will launch Innerspace if it is not already running. However:
- If Innerspace needs to patch, it will do so, reload itself, and run the script you were trying to run, but it will not include any parameters you were passing in (i.e. the "MainGroup" toon list profile name.
- If Innerspace is already open, it simply runs the script with the parameters (which is a good thing).
- There is VERY limited user error checking. So use some common sense. For example: If you say you want the toon Kannkor to load on IS8 and that's it, it will load 1 session (IS1), and fail to load Kannkor because it can't find IS8. It's best to start to have the entire set (Kannkor IS1, Kannkor2 IS2 etc), or use the "Any" option.
- The odd time, when changing toons around, 1 session would crash. I can't reproduce this bug other than rarely, and randomly, so I believe it still exists. If this happens to you, look at the uplink console of that computer, and you should see a line such as: Command given: ogre -<stuff>-. I need the <stuff>. It will have your toon name, but if it has anything else (including spaces) I need to know exactly what that other stuff is.
- Note: When you run this, it loads ISXOgre into your uplink. Which should patch ISXOgre fine. However if you are in the game and need to patch ISXOgre, you will need to unload the extension from the uplink console (done via loading the console and ext -unload isxogre).
Using Multiple Computers
If you are using multiple computers, you must have them "connected" prior to running your desktop shortcuts.
If you like, you can create yet another desktop shortcut to connect them. Just create a shortcut to Innerspace.exe like you did above, and when you get to the part about appending the script name, append this:
-
runscript eq2ogrecommon/ogreconnect
So your full shortcut link should look like this:
-
D:\Games\InnerSpace\InnerSpace.exe runscript eq2ogrecommon/ogreconnect
And give this shortcut a name like "Ogre Connect"
- When using this shortcut, "nothing" visually you can see will happen. It simply connects your computers.
- Ensure all computers are using the same naming in the game profile in Innerspace game configuration.
Now if you've accomplished all of the "Step by Step" section above, you will have multiple shortcuts on your desktop. A typical startup sequence if you are using multiple computers would be:
- Launch Innerspace on all computers.
- Double-Click your "Ogre Connect" desktop shortcut.
- Double-Click your "Auto Login" desktop shortcut
- This can be either the one that launches the UI or one that launches one of your toon list groups.


