Difference between revisions of "OgreMCP"
(→adjusting static frame buttons) |
(→Adding more buttons) |
||
| Line 814: | Line 814: | ||
Lastly set the value to TRUE(case matters) and of course to commit the changes hit apply | Lastly set the value to TRUE(case matters) and of course to commit the changes hit apply | ||
====Adding more buttons==== | ====Adding more buttons==== | ||
| − | + | On the MCP click the setup button up on the top above the mcp buttons this will bring up the Edit MCP settings UI. | |
| − | + | ||
| − | + | ||
| − | + | ||
| − | + | ||
| − | + | ||
| − | + | ||
| − | + | ||
| − | + | ||
| − | + | ||
| − | + | ||
| − | + | ||
| − | + | ||
The key numbers to know here are the button height and width and the spacing height and width. | The key numbers to know here are the button height and width and the spacing height and width. | ||
| − | Lets say that we want to add another column to the page frames. | + | Lets say that we want to add another column to the page frames. We simply add the button width and the button width spacing together (54) and add that to the Width value at a minimum. I would suggest for aesthetic reason adding in between one and a half the button spacing value and twice the value. |
| − | + | [[Image:MCPEditSetting.png|text-top|200x200px]] | |
| − | + | ||
| − | + | ||
| − | + | ||
| − | + | ||
| − | + | ||
| − | + | ||
| − | + | ||
| − | + | ||
| − | + | ||
| − | + | ||
| − | + | ||
====adjusting static frame buttons==== | ====adjusting static frame buttons==== | ||
Revision as of 15:09, 13 January 2013
Contents
OgreMCP
Tab Summary
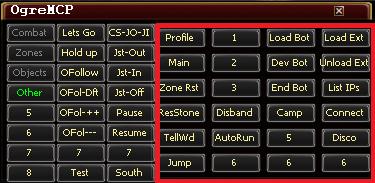
MCP = Master Control Panel. OgreMCP is used to pass commands via the uplink. To load OgreMCP, type "ogre MCP" and a new window appears.
Note: Nearly all of these buttons are sending commands through the uplink, and will affect ALL sessions connected.
With Version 15, OgreMCP was completely redesigned. It is now one of the most advanced UI windows in the Ogre collection. It has taken customization to the next level.
Types of buttons
There are four different types of buttons.
- Setup button - When you click the setup button a new window appears that allows you to customize some of the options about the MCP itself. Such as the height/width of the window, of the static window, of the buttons, and even the spacing between the buttons. Generally speaking, I'd recommend keeping the defaults.
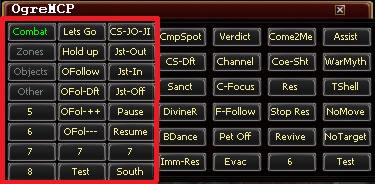
- Frame changers - The first 4 buttons on the left most side. By default they are labeled Combat, Zones, Objects, and Other. You can rename these to anything you want. They simply change the "Frames" (or sets of buttons) on the right hand side.
- Static buttons - These are buttons that never move. This is anything on the left side. By default, this is 18 buttons. Note: Four of these buttons are the frame changers. The other buttons can hold any command.
- Frame buttons - These buttons are specific to each frame and are visible or hidden depending on which "Frame changer" is selected. By default there are 24 buttons. These buttons can hold any command.
About Commands
What is a command?
The MCP is made up of two types of files. Visual files, and command files. The visual files simply show the buttons and have a (not visible) "command" attached to it. When this button is clicked, is the command is run.
Where do I get commands?
There are two command files. One that is provided and updated by me. The other is one you can add custom commands too. The reason there are two, is so when I update the master command file, it doesn't effect yours.
How do I make/use/change/ buttons?
You simply right click a button and an edit window appears.
[Need picture of right click edit window]
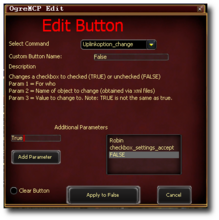
From here, you select the command. If you're not sure what the command does, select it and read the description. If it requires parameters, be sure you enter them in. Under the select command is a custom button name, so you can name the button something that will make sense to you. When you are ready to save it, press the Apply button.
Default Configuration
This is just a brief description of the default setup of the MCP. For a list of commands and customization options see the commands section.
Main Buttons (Left side)
- There are multiple "Tabs". Clicking each of these changes which buttons appear.
- Combat
- Zones
- Objects
- Other
- 5
- 6
- 7
- 8
- There are 24 static buttons (includes the tabs from above). These never disappear, regardless of which "tab" you are on.
- Lets go - Defaulted on when the bot loads. This is used to remove the following flags: Hold up, No move, Do not move, Camp spot, Fiegn death. You can also use a chat command of "lets go" in a tell/group/raid to activate this command. -Queued command. Happens when the bot finishes what it is doing.
- Hold up - Turns OFF auto follow. -Forced command. This happens immediately, regardless if the bot is doing other things.
- "OFollow" - OgreFollow
- "OFol-Dft" - OgreFollow Defaults
- "OFol-++" - Increases follow range (Puts more distance between you and the follow person)
- "OFol ---" - Decreases follow range (Puts less distance between you and the follow person)
- CS-JO-JI - CampSpot (Default), Joust Off (default), and Joust In. This is used to set all your toons to a campspot of where they are, but allow melee to fight. Gives easy access to joust out if needed.
- Jst-Out / Jst-In / Jst-Off - See Jousting below.
- Pause - Presses the "pause" button on the bot.
- Resume - Resumes the bot (counter to Pausing it).
Jousting
- "Jousting" just temporary disables campspot(so move into melee range is then allowed). When Jousting is turned back on, it re-actives campspot (thus disabling move into melee range).
- USAGE:
- Note: Move to Area must be checked on the settings tab of the character for the campspot to work.
- Turn Campspot on
- Use "Jst off" (Joust Off) and input anyone you do not want to be jousting (such as "casters", or "healers"). [Optional step]
- When you wish to allow your jousters to melee, hit "Joust in"
- When you wish your jousters to get out, hit "Joust out"
- NOTE Currently Jousting only supports people who use "move into melee range" as their way of "Jousting in".
- Any Joust command will do nothing if you do not have Campspot enabled.
- Joust commands are added to the main queue. Meaning when the bot is finished doing it's current task, it will go through the queued commands. You can override a Joust in command with a Joust out command, assuming the bot isn't doing anything else (such as a bard in the middle of casting a spell while they are running).
- Other uses: You are fighting a mob that expodes, or you need EVERYONE to run very far away at a certain point in the fight. Go to the "safe spot" and turn campspot on for everyone, then hit "Joust in". This temporary turns off campspot. You can then move your toons any where you want. When the mob is going to explode, hit "Joust out" and they will run to your camp spot.
Combat Tab
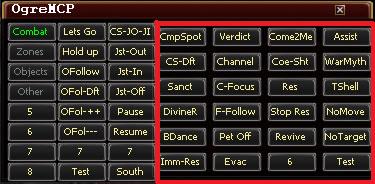
- CmpSpot - Forces people to stay within a certain distance of a pre-designed spot. (Useful for knockbacks etc) (NOTE: Requires "Move to Area" enabled on Ogrebot)
- Input box #1 - Camp spot for who? - Who will be listening to this command. Default is all.
- Input box #2 - Distance - Min distance <space> max distance.
- Min distance - How close do you stay to this spot. Default is 2 (almost right on top of it).
- Max distance - Only move to this distance if you are within this close to it (don't need any zone-wide running). Default is 75, which is quite far away.
- CS-Dft - CampSpot Default. Equal to pressing CampSpot and pressing <Enter> twice.
- Sanct - Sanctuary - Queues up the spell Sanctuary for templars (if it's ready).
- DivineR - Casts Divine Recovery if it's available (Cleric AA).
- BDance - Makes you break dance.. err.. Will cast Blade Dance if it is available (Bard AA).
- Imm-Res - Immaculate Revival (Cleric end line ability).
- If any priest or fighter is dead, the ability is cast.
- If any 2 people are dead, the ability is cast.
- If you wish to change the # of people dead to cast, you can pass it 1 parameter(in OgreMCPXML). The default is 2 and doesn't need to be specified.
- Otherwise it will not cast.
(Changed Sanctuary, Blade Dance, Divine Recovery over to the new CastFromUplink function. )
- Verdict - If you can cast Verdict, you will.
- Channel - If you can cast Channel, you will.
- C-Focus - If you can cast Channeled Focus, you will.
- F-Follow - ...
- Pet Off - Back's your pet off.
- Evac - If you can cast evac, you will.
- Come2Me - Move to the person giving the command. The following can be a prefix for the come to me command. Also works as a chat command as follows.
- Note: The person giving the command must be authorized (in eq2chars.inc).
- Note: You need Move To Area selected for these to work, and a target (can be yourself).
- "come to me" - Everyone.
- "melee come to me" - Fighters/scouts only.
- "mages come to me" or "casters come to me" - Mages only.
- "priests come to me" or "healers come to me" - Priests only.
- "g# come to me" - Anyone in a raid in that group #.
- "toonname come to me" - Anyone with that toon name, such as "Kannkor come to me".
- Coe-Sht - If you can cast Coercive Shout, you will.
- Res - Counter to "Stop Res" below. Turns Resing on ONLY if it was turned off via Stop Res.
- Stop Res - Temporarly turns resing off. Use "Res" to re-enable.
- Revive - Revive - WARNING! If there are multiple options, it does NOT choose the one you have highlighted. I haven't spent the time to determine which one it does.
- 6
- Assist - "Dynamic Assist" - Change assists on-the-fly. Note: Auto assist MUST be checked or this option does nothing.
- Input box #1: Who should be assisting? Who will listen to this command.
- Input box #2: Who do you want to assist?
- Example usage: Input box#1: Mages, Input Box #2: Kannkor. This would make all mages assist Kannkor. I could then do: Input Box#1: Melee, Input box #2: Roknnak. All melee would be assisting Roknnak (while all casters are still assisting Kannkor).
- Note: Who should be assisting can take "g1, g2, g3, g4" as options. For example, lets say you're in g1 and your botted toon is in g4, you could do assist -> g4 -> tank_in_g4_name.
- Note: Putting a blank option in Input Box #2 clears this option for EVERYONE.
- WarMyth - Warlock Myth toggle.
- TShell - If you can cast Tortoise Shell (AOE blocker), you will.
- NoMove - "Do not move" - temporarily disables move into melee range, move behind, and auto follow. Use "Lets go" to clear.
- No Target - Clears your target. Useful to stop many various movements.
- Test - Test used by Kannkor. You can ignore this (just runs a test file that you don't have).
Zones Tab
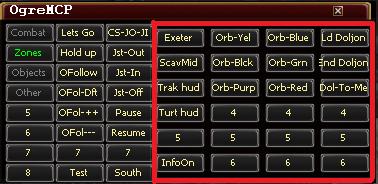
(Zones - Has zone specific stuff. Mostly HUDs.
- Exeter - When fighting Maldonous (sp?) Exeter in Palace of Ferzhul, every 20% all 6 people in the group must click the flames. This does that for you. Click once every time he goes away.
- ScavMid - ...
- Trak hud - On-screen HUD that puts the name/distance of the closest PC and closest special to you. I use it when I kill Trak. (Toggle on off)
- Turt hud - ...
- 5
- InfoOn - Toggles information about a Named NPC or npc, and distance from your cleric/shaman/druid in your group.
- Orb-Yel - Orb clickers for Penda/Kendis
- Orb-Blck - Orb clickers for Penda/Kendis
- Orb-Purp - Orb clickers for Penda/Kendis
- 4
- 5
- 6
- Orb-Blue - Orb clickers for Penda/Kendis
- Orb-Grn - Orb clickers for Penda/Kendis
- Orb-Red - Orb clickers for Penda/Kendis
- 4
- 5
- 6
- Ld Doljon - Lord Bob, Loads it on all sessions.
- End Doljon - Lord Bob, Ends it on all sessions.
- Dol-To-Me - Lord Bob, Jump - Tells everyone to get to the pad your toon is closest too.
- For example: When he puts 1 pad acid, if your tank is NOT on it, hit the button, everyone will come to you (they jump). If your tank is ON the acid pad, jump to a different one and hit it.
- 4
- 5
- 6
Objects
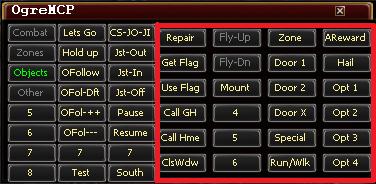
(Objects - Will have any button that controls objects commonly used out of combat. Such as repair gear, get/use the flag, hail, etc.)
- Repair - Repair your guild if you are:
- Near a Guild Mender
- Near a Mender
- Near a Mender bot
- There are a few others that are hard coded in, like the one in VP etc. If you have any other spots you want coded in let me know.
- Get Flag - If near a Guild Strategist will hail and get a flag.
- Use Flag - If near a Guild Strategist will hail and send you to the rally point.
- Call GH - Calls to your Guild Hall.
- Call Home - Calls to your home.
- ClsWdw - Close top window. This hits ESC on all your computers.
- Fly-Up - Will hold/release "Home" (to fly up on a flying mount).
- Fly-Dn - Will hold/release "End" (to fly Down on a flying mount).
- Mount - Toggles mount.
- 4
- 5
- 6
- Zone - Clicks on most zones to instances.
- Door 1 - When the option comes up of which zone to zone into, use this for option 1.
- Door 2 - When the option comes up of which zone to zone into, use this for option 2.
- Door X - When the option comes up of which zone to zone into, use this for option for an input box to enter which door number.
- Special - Double click the nearest "Special" (as per radar) to everyone.
- Run/Walk - Toggles run/walk
- AReward - Accept Reward. When you finish a quest and the reward window pops up, this will accept it. Note: Make sure you can accept the reward, and it's not a choice reward.
- Hail - Everyone will assist you, and hail your target
- Opt 1-4 - While talking to an NPC (the bubble windows) everyone will do which conversation option as you press. Useful for shard quests.
Other Tab
- Profile - ...
- Main - Toggles opens/minimized the "main" window of the bot.
- Zone Rst - Allows you to reset instance timers. The Zones window must be open on the main character in order for this to work.
- ResStone - Casts a res stone (works for all priests).
- TellWd - If the tell window has been used, it re-opens it.
- Jump - Sends a Jump command through the uplink.
- 1
- 2
- 3
- Disband - Drop group.
- Auto Run - Toggle Auto run.
- 6
- Load Bot - Loads the bot.
- Dev Bot - Loads the development version of the bot.
- End Bot - Ends the bot.
- Camp - Camps everyone to desktop.
- 5
- 6
- Load EXT - Load ISXOGRE
- Unload EXT - Unload ISXOGRE
- List IPs - Lists all the computers in the uplink.
- Connect - Connects to the computers listed in EQ2Chars.inc
- Disco - Disconnects to the computers listed in EQ2Chars.inc
- 6
List of commands
A - C
- Apply_Verb
- Relay all the apply verb [Actor name] [case sensitive verb]
- Parameter 1 = Actor search string
- Parameter 2 = verb - case sensitive
- Note - This is an advanced button.
- Relay all the apply verb [Actor name] [case sensitive verb]
- AReward
- Accepts reward window. Note can only be done on rewards that have no loot choice.
- Assist
- Sets assists from parameters.
- Parameter 1 = Person to assist.
- Parameter 2 = Who will change their assist..
- Sets assists from parameters.
- AssistUI
- Sets assists from a pop up UI.
- Assistx2
- Sets assists for two toons from parameters.
- Parameter 1 and 3 = Person to assist.
- Parameter 2 and 4 = Who will change their assist.
- Sets assists for two toons from parameters.
- Assistx3
- Sets assists for three toons from parameters.
- Parameter 1 and 3 = Person to assist.
- Parameter 2 and 4 = Who will change their assist.
- Sets assists for three toons from parameters.
- AutoRun
- Presses the auto run key.
- Call_GH
- Calls to guild hall if not already in one.
- Camp
- Night night time... Camp to desktop.
- Cancel_Cast..
- Cancels current ability being cast then casts defined spell/ability
- Parameter 1 = Who should cast. Example All
- Parameter 2 = Spell to be cast.
- Note - Abilities must be base names. Kick will work. Kick III will not.
- Cancels current ability being cast then casts defined spell/ability
- Cancel_CastOn..
- Cancels current ability being cast then casts defined spell/ability on specified character
- Parameter 1 = Who should cast. Example All
- Parameter 2 = Spell to be cast.
- Parameter 3 = Cast spell on this person.
- Note - Abilities must be base names. Kick will work. Kick III will not.
- Cancels current ability being cast then casts defined spell/ability on specified character
- Cancel_Maintained
- Cancel Maintained ability
- Parameter 1 = Ability to cancel
- Cancel Maintained ability
- Cast..
- Tells [Bots] to cast a specific [ability].
- Parameter 1 = Who should cast. Example All
- Parameter 2 = Spell to be cast.
- Note - Abilities must be base names. Kick will work. Kick III will not.
- Tells [Bots] to cast a specific [ability].
- CastOn..
- Tells [Bots] to cast a specific [ability] on specific toons.
- Parameter 1 = Who should cast. Example All
- Parameter 2 = Spell to be cast.
- Parameter 3 = Cast spell on this person.
- Note - Abilities must be base names. Kick will work. Kick III will not.
- Tells [Bots] to cast a specific [ability] on specific toons.
- CastOn..x2
- Tells [Bots] to cast a specific [ability] on specific toons.
- Parameter 1 and 4 = Who should cast. Example All
- Parameter 2 and 5 = Spell to be cast.
- Parameter 3 and 6 = Cast spell on this person.
- Note - Abilities must be base names. Kick will work. Kick III will not.
- Tells [Bots] to cast a specific [ability] on specific toons.
- Castx2..
- Tells [Bots] to cast a specific [ability].
- Parameter 1 and 3 = Who should cast. Example All
- Parameter 2 and 4 = Spell to be cast.
- Note - Abilities must be base names. Kick will work. Kick III will not.
- Tells [Bots] to cast a specific [ability].
- Change_Campspot
- Relays a change to active campspots.
- Parameter 1 = XCord
- Parameter 2 = YCord
- Parameter 3 = ZCord
- Relays a change to active campspots.
- ChangeCAListBoxItem
- Changes a list box item on the CA tab only.
- Parameter 1 = Who to change.
- Parameter 2 = Ability name.
- Parameter 3 = TRUE or FALSE (case sensitive).
- Changes a list box item on the CA tab only.
- ChangeCAListBoxItemx2
- Changes a list box item on the CA tab only.
- Parameter 1 and 4 = Who to change.
- Parameter 2 and 5 = Ability name.
- Parameter 3 and 6 = TRUE or FALSE (case sensitive).
- Changes a list box item on the CA tab only.
- ChangeCAListBoxItemx5
- Changes a list box item on the CA tab only.
- Parameter 1, 4, 7, 10 and 13 = Who to change.
- Parameter 2, 5, 8, 11 and 14= Ability name.
- Parameter 3, 6, 9, 12 and 15 = TRUE or FALSE (case sensitive).
- Changes a list box item on the CA tab only.
- ChangeNamedCAListBoxItem
- Changes a list box item on the Named CA tab only.
- Parameter 1 = Who to change.
- Parameter 2 = Ability name.
- Parameter 3 = TRUE or FALSE (case sensitive).
- Changes a list box item on the Named CA tab only.
- ChangeNamedCAListBoxItemx2
- Changes a list box item on the Named CA tab only.
- Parameter 1 and 4 = Who to change.
- Parameter 2 and 5 = Ability name.
- Parameter 3 and 6 = TRUE or FALSE (case sensitive).
- Changes a list box item on the Named CA tab only.
- ChangeNamedCAListBoxItemx5
- Changes a list box item on the Named CA tab only.
- Parameter 1, 4, 7, 10 and 13 = Who to change.
- Parameter 2, 5, 8, 11 and 14= Ability name.
- Parameter 3, 6, 9, 12 and 15 = TRUE or FALSE (case sensitive).
- Changes a list box item on the Named CA tab only.
- ChangePriorityListBoxItem
- Changes a list box item on the Priority tab only.
- Parameter 1 = Who to change.
- Parameter 2 = Ability name.
- Parameter 3 = TRUE or FALSE (case sensitive).
- Changes a list box item on the Priority tab only.
- ChangePriorityListBoxItemx2
- Changes a list box item on the Priority tab only.
- Parameter 1 and 4 = Who to change.
- Parameter 2 and 5 = Ability name.
- Parameter 3 and 6 = TRUE or FALSE (case sensitive).
- Changes a list box item on the Priority tab only.
- ChangePriorityListBoxItemx5
- Changes a list box item on the Priority tab only.
- Parameter 1, 4, 7, 10 and 13 = Who to change.
- Parameter 2, 5, 8, 11 and 14= Ability name.
- Parameter 3, 6, 9, 12 and 15 = TRUE or FALSE (case sensitive).
- Changes a list box item on the Priority tab only.
- CheckGear
- Reports gear conditions.
- ClsWdw
- Close Window. Closes the top most window in the game.
- CmpSpot
- Bring up the options for Campspot.
- Come2Me
- Tells [Bots] to move to a specific [person].
- Parameter 1 = Person to move too.
- Parameter 2 = Who should move. Example All
- Parameter 3 = Precision. Default is 3.
- Tells [Bots] to move to a specific [person].
- Connect
- Connect to other computers that are in your eq2chars file.
- CS-Dft
- Sets campspot. using default camp spot options
- Parameter 1 = Who will camp spot.
- Sets campspot. using default camp spot options
- CS-JO-JI
- [C]amp[S]pot default (everyone). [J]oust [O]ff default (Mages and priests). [J]oust [I]n (melee)</Setting>
- Parameter 1 = Campspot for who</Setting>
- Parameter 2 = Who should joust off</Setting>
- [C]amp[S]pot default (everyone). [J]oust [O]ff default (Mages and priests). [J]oust [I]n (melee)</Setting>
D - J
- Dev_Bot
- Loads Development version of Ogre Bot.
- Disband
- Disband your group.
- Discon
- Disconnect to other computers that are in your eq2chars file.
- DM_Cancel
- Cancels the rating window for Dungeon Maker
- Doljon_End
- Ends the Lord Doljon script.
- Doljon_Ld
- Loads the Lord Doljon script.
- Dol-To-Me
- Lord Doljon Move to me command.
- Door
- When zoning and you have the option to select which zone this will select the one you use as a parameter.
- Parameter 1 = option to choose.
- Note: curently not working
- When zoning and you have the option to select which zone this will select the one you use as a parameter.
- DoorX
- When zoning and you have the option to select which zone this will bring up door ui and allow you to select the one you use as a parameter.
- Note: curently not working
- DoV_RaidDebuff
- Casts the raid debuff
- Parameter 1 = Who to cast.
- Parameter 2 = ID or name of who to cast the debuff on.
- Note: If you use ALL - everyone will cast it.
- Casts the raid debuff
- End_Bot
- Ends Ogre Bot. Works on any version of Ogrebot [Release or development build].
- End_Script_Relay
- Ends a script
- Parameter 1 = script to end
- Ends a script
- Evac
- Anyone with an evacuate ability will use it.
- ExecuteAtom
- Relays an OgreBotAtom...
- Parameter 1 = ForWho
- Parameter 2 = AtomName
- Parameter 3-11 = Params
- Relays an OgreBotAtom...
- F-Follow
- Does a Force follow as per what is set in OgreBot.
- Fly-Dn
- Presses or releases the fly down [or swim down] button.
- Note: Will continue until pressed again. Think of it as autorun for flying (or swimming)up/down
- Fly-Up
- Presses or releases the fly up [or swim up] button.
- Note: Will continue until pressed again. Think of it as autorun for flying (or swimming)up/down
- Get_Flag
- Gets a flag from a guild strategist.
- Hail
- Everyone will assist you and hail your target.
- HoldUp
- This button turns auto follow off.</
- Parameter 1 = Command for who? Default = All
- This button turns auto follow off.</
- Imm-Res
- Uses Cleric AA Immaculate Revival if X people are dead.
- Will always cast if a priest or fighter is dead.
- Parameter 1 = Threshold of how many currently dead before casting.
- ItemDB
- Loads Ogre Item Database.
- Which is used to help keep track of who has what item.
- Note: This is in Early Development still.
- Jst-In
- Joust In.
- When campspot is turned on you will joust In (if permitted).
- Parameter 1 = Command for who? Default = All
- Jst-In-Who
- Joust In.
- When campspot is turned on you will joust In (if permitted).
- Parameter 1 = Who will Joust In
- Jst-Off
- Joust Off.
- Brings up input box to tell certain classes or people they are not permitted to joust in.
- Jst-Out
- Joust Out.
- When campspot is turned on you will joust out (if permitted).
- Parameter 1 = Command for who? Default = All
- Jst-Out-Who
- Joust Out.
- When campspot is turned on you will joust out (if permitted).
- Parameter 1 = Who will Joust out
- Jump
- Sends jump key to all clents
L - P
- LetsGo
- This button removes movement restrictions such as HoldUp and campspot.
- Parameter1 = Command for who? Default = All
- This button removes movement restrictions such as HoldUp and campspot.
- List_IPs
- List any computers connected via the uplink.
- Load_Bot
- Loads Ogre Bot.
- Load_Ext
- Loads ISXOgre.
- Main
- Toggles the main window. Same as pressing Show Main or Hide Main.
- Mount
- Clicks the mount ability. If you have a mount it will cancel it. If you do not have a mount it will summon it.
- Move2Area
- Tells [Bots] to move to a specific [person].
- Parameter 1 = XCord
- Parameter 2 = YCord.
- Parameter 3 = Who should move. Example All
- Parameter 4 = Precision. Default is 3.
- Tells [Bots] to move to a specific [person].
- NoMove
- Prevents incombat movement such as move into melee range and move behind.
- Note:Use LetsGo to clear the NoMove flag.
- NoTarget
- Clears everyones target.
- OFol---
- Decreases the distance of OgreFollow.
- OFol-++
- Increases the distance of OgreFollow.
- OFol-Dft
- Ogre Follow using default settings (no input box).
- Parameter1 = Who Should Follow
- Parameter2 = Who to follow
- Parameter3 = Min Distance. Default 8
- Parameter4 = Max Distance. Default 100
- Parameter5 = Break on follow. Default FALSE
- Ogre Follow using default settings (no input box).
- OFollow
- Brings up the input box options for OgreFollow.
- Ogre_Command
- Local ogre command...
- Parameter 1 = ogre command
- Parameter 2 to 11 = Parameters
- Local ogre command...
- Ogre_CommandRelay
- relay all ogre command...
- Parameter 1 = ogre command
- Parameter 2 to 11 = Parameters
- relay all ogre command...
- OgreBotAtom
- Executes an atom if Ogrebot is loaded.
- Parameter 1: atom name. Case sensitive.
- Parameter 2-11: Parameters
- Note: Does NOT relay the command.
- Executes an atom if Ogrebot is loaded.
- OgreBotAtomRelay
- Executes an atom if Ogrebot is loaded.
- Parameter 1: atom name. Case sensitive.
- Parameter 2-11: Parameters
- Note: Does relay the command.
- Executes an atom if Ogrebot is loaded.
- OgreIRC
- Sends a message or command to OgreIRC
- Parameter 1 to 20 = OgreIRC Commands and paramters
- Sends a message or command to OgreIRC
- Opt_Num
- After hailing you can use this to converse with an NPC.
- Parameter 1 = chat option to choose.
- After hailing you can use this to converse with an NPC.
- Pause
- Pauses all the bots.
- Pet_Off
- Everyone does a pet back off command.
- Portal_To_Guild
- Relays to use Magic Door to Guild Hall
- Profile
- Loads a profile from a pop up UI.
R - Z
- RawCommand
- Executes in the console
- parameter 1 - 11
- Example that would load ogre idol
- Parameter 1 = ogre
- Parameter 2 = idol
- Note: It will pass 10 parameters. NULL for any not filled in. This must be handled by the script.
- Executes in the console
- RelayRunScript
- relay all - Runs a script.
- parameter 1 = relay too: [All - All Other - IS1]
- Parameter 2 = Scriptname
- Parameter 3-12 = Parameters for script
- Note: It will pass 10 parameters. NULL for any not filled in. This must be handled by the script.
- relay all - Runs a script.
- ReLd_Bot
- Reloads Ogre Bot.
- Repair
- Uses a repairer or repair bot.
- Res
- Removes the temporary [Stop Res] flag.
- ResStone
- All priests will cast their resurrection stone..
- Resume
- Resumes all the bots.
- Revive
- First and foremost - stop dying.
- This button presses the revive button.
- WARNING It does NOT take your selection into consideration. It seems to choose the one the game would choose by default.
- Run_Walk
- Toggles run.
- RunScript
- Runs a script (no relay).
- parameter 1 = Scriptname
- Parameter 2-11 = Parameters for script
- Note: It will pass 10 parameters. NULL for any not filled in. This must be handled by the script.
- Runs a script (no relay).
- Special
- Clicks the nearest special.
- StopRes
- Sets a temporary Stop Res.
- Target___
- Relays an OgreBotAtom...
- parameter 1 = ForWho
- Relays an OgreBotAtom...
<Setting Name="two2">Parameter 2 = Target Name
- Partial search string. Special 'me' can be used to specify the person.
- Target___x2
- Relays an OgreBotAtom...
- parameter 1 and 3 = ForWho
- Parameter 2 and 4 = Target Name
- Note:Partial search string. Special 'me' can be used to specify the person.
- Relays an OgreBotAtom...
- TellWD
- Shows the tell window if you have received a tell and closed the window down.
- Test
- Button for Kannkor to test things.
- Trak-HUD
- Displays or removes the Trakanon HUD.
- Display 1 = Distance from Orb
- Display 2 = Nearest PC and distance
- Turt-HUD
- Displays or removes the Turtles HUD [for the Tert raid encounter in Kraytoc].
- Display 1 = Right - Health - Distance
- Display 2 = Left - Health - Distance
- Unload_Ext
- Unloads ISXOgre.
- Uplinkoption_change
- Changes a checkbox to checked (TRUE) or unchecked (FALSE)
- param 1 = For who
- Param 2 = Name of object to change (obtained via xml files)
- Param 3 = Value to change to. Note: TRUE is not the same as true.
- Changes a checkbox to checked (TRUE) or unchecked (FALSE)
- Uplinkoption_changex2
- Changes a UI option
- param 1 and 4 = For who
- Param 2 and 5 = Name of object to change (obtained via xml files)
- Param 3 and 6 = Value to change to. Note: TRUE is not the same as true.
- Changes a UI option
- Uplinkoption_changex6
- Changes a UI option
- params 1-4-7-10-13-16 = For who
- Param 2-5-8-11-14-17 = Name of object to change (obtained via xml files)
- Param 3-6-9-12-15-18 = Value to change to. Note: TRUE is not the same as true.
- Changes a UI option
- Use_Flag
- Uses a flag from a guild strategist.
- UseItem..
- Tells [Bots] to Use a specific [Item].
- Checks equipped gear first, then inventory.
- parameter 1 = Who should use. Example All
- Parameter 2 = Item to be used.
- Note - Item names must be exact.
- UseItemOn..
- Tells [Bots] to Use a specific [Item].
- Checks equipped gear first, then inventory.
- parameter 1 = Who should use. Example All
- Parameter 2 = Item to be used.
- Parameter 3 = Use item on this person.
- Note - Item names must be exact.
- WarMyth
- Toggles Warlock Mythical ability.
- Zone
- Will attempt to zone you.
- Zone_Rst
- Loads Ogre zone resetter.
MCP Customization and You
The out of the box settings work for a majority of users. Most people, if they need to make changes will only add and remove buttons. Before making any file changes make sure you backup and understand the changes you are making.
Files
MCP Files
- bak.MCPCommandsCustom.xml
- Backup source of MCP Custom command file. Used for patch purposes
- LoadOgreMCP.iss
- MCP Script. Do not screw with it if you know whats good for you.
- MCPCommands.xml
- The complete default command list and parameters of MCP.
- DO NOT make changes to this file. Use the MCPCommandsCustom.xml file to add any changes you may wish.
- MCPCommandsCustom.xml
- MCP Custom command file. Use this file to add any functionality to your MCP buttons.
- Consult the MCPCommands.xml file for file structure.
- MCPCustomSettings.xml
- edit to make manual button and layout changes
- MCPDefaultSettings.xml
- source file for MCP button layout. Make all changes to MCCPustomSettings.xml not this file
Functions
Examples
Adding an uplink radio button toggle
Let's say we want to change our brigand named Robin from sitting behind the mob to move to the front for one of his special abilities using a nice simple button rather than getting all clicky.
1st right click the MCP button.
Select Uplinkoption_change in the drop down list to the right of select command.
In the text box type a name for your button.
In the additional parameter section first add the person this button apply to, Robin in this case, but you can also specify all, melee, mage or any of the other general categories
Next add the parameter that will be changing.
If you dont know what the option is you need to change you have a couple methods of finding out open UplinkcontrollerXML.xml in your text editor.
Use the search function or scroll though the file to find the text of the option, in this case Move in Front of mob.
<checkbox name='checkbox_settings_moveinfront' template='chkbox'>
  <X>165</X>
  <Y>110</Y>
  <Text>Move In Front of mob</Text>{highlight}
  <OnLeftClick>
    This:RightClick
    This.Parent.FindChild[ChkBoxMoveBehindID]:UnsetChecked
    This.Parent.FindChild[ChkBoxMoveBehindID]:RightClick
 </OnLeftClick>
  <OnRightClick>
    relay all "Script[\${OgreBotScriptName}]:QueueCommand[call UplinkControllerFunction ${This.Type} checkbox_settings_moveinfront ${This.Checked}]"
  </OnRightClick>
</checkbox>
Notice you should have come up on the 4th line of this snippet of code.
On the first line of code you see name='checkbox_settings_moveinfront', this gives us the correct name of the option we want to change, checkbox_settings_moveinfront.
Alternately you can look in the OgreUIXML.xml
Use the search function(recomended) or scroll though the file to find the text of the option, in this case Move in Front of mob.
<checkbox name='checkbox_settings_moveinfront' template='EQ2OB_Checkbox_Settings'>
    <Text>Move in front of mob</Text>
    <OnLeftClick>
       TabConfig.Settings:ChangeSettingDetailsFromUI[${This.Name}]
       if ${This.Checked} && ${UIElement[${OBUI_checkbox_settings_movebehind}].Checked}
       UIElement[${OBUI_checkbox_settings_movebehind}]:LeftClick
    </OnLeftClick>
</checkbox>
Lastly set the value to TRUE(case matters) and of course to commit the changes hit apply
Adding more buttons
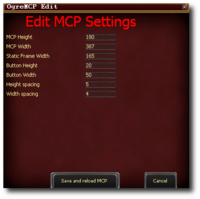
On the MCP click the setup button up on the top above the mcp buttons this will bring up the Edit MCP settings UI.
The key numbers to know here are the button height and width and the spacing height and width.
Lets say that we want to add another column to the page frames. We simply add the button width and the button width spacing together (54) and add that to the Width value at a minimum. I would suggest for aesthetic reason adding in between one and a half the button spacing value and twice the value.
adjusting static frame buttons
On the MCP clck the setup button up on the top above the mcp buttons this will bring up the Edit MCP settings UI. To add more static frame buttons or less simply adjust the width of Static Frame Width by the value of the button width. Remember to increase the witch of the MCP to compensate for the increase in the static frame width.
Keep in mind that column 1 of the static frame is hard coded to switch pages of the frames.
